Gilboa Smart Home - Automation control App

As I mentioned earlier, there are couple of tools available to control your home automation (such as Active Home Pro, powerhome and probably others I'm not aware of). Obviously those tools will cost you money and will support dedicated devices.
In the last year I have tried to build a tool that will support several devices and triggered by many events. Note that this is beta version, that might have some issues, but it is supposed to do the work... You can download and use it if you like, but then I expect you to notify me regarding any issues or bugs so I can improve. I will try to improve and update the tool so check out for updates once in a while.
In this page I will try to give a brief explanation of all the features in the tool, and how to configure it, feel free to notify me whether something is not working properly (please do).
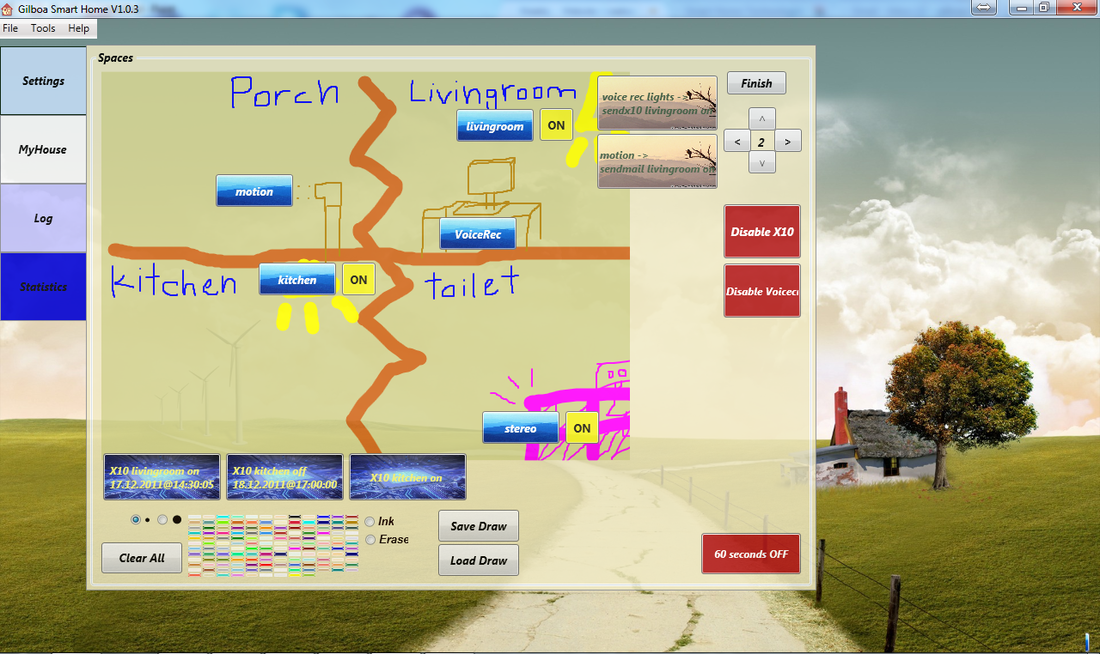
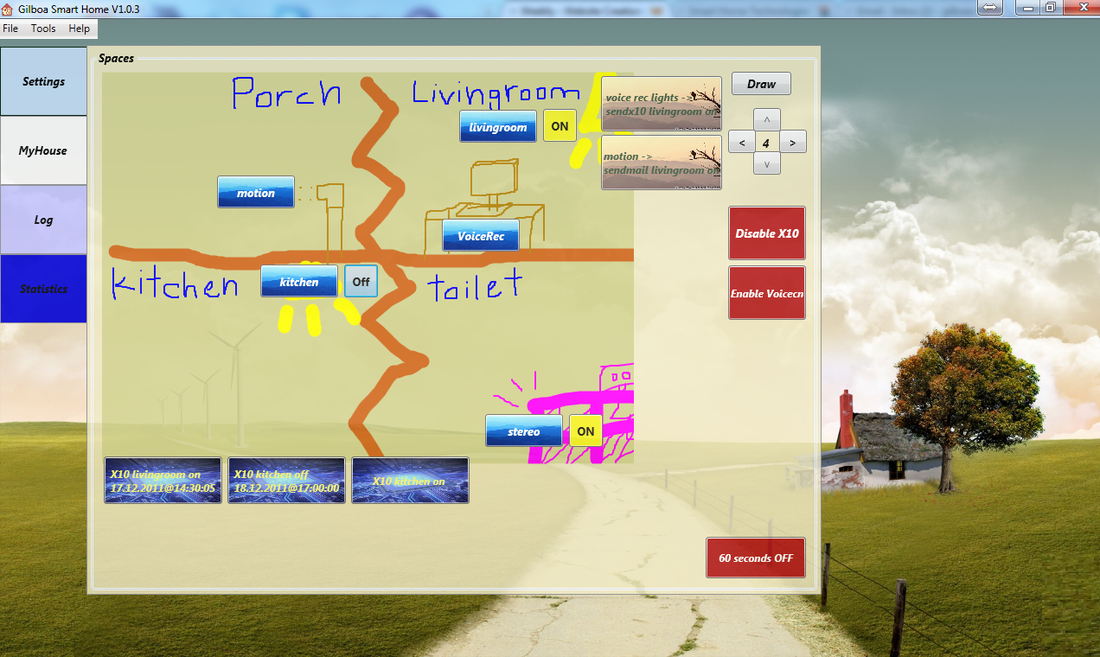
Here is an example of how you're monitor tab can look like once you have configured all devices, macros and actions, and all X10 plug in devices are ON:
In the last year I have tried to build a tool that will support several devices and triggered by many events. Note that this is beta version, that might have some issues, but it is supposed to do the work... You can download and use it if you like, but then I expect you to notify me regarding any issues or bugs so I can improve. I will try to improve and update the tool so check out for updates once in a while.
In this page I will try to give a brief explanation of all the features in the tool, and how to configure it, feel free to notify me whether something is not working properly (please do).
Here is an example of how you're monitor tab can look like once you have configured all devices, macros and actions, and all X10 plug in devices are ON:
1. Before Installing the app
Before you download and install the application I've linked below, there are few basic things that has to be installed on your PC - probabaly some of them already exist on your PC anyway, but verify just in case.
All of them free and really easy to install (5 minutes top), so follow the instructions how to:
Now, that we have passed this, you can download & install the GSH Setup wizard .
INSTALLING THE APPLICATION
Download the application from the link below. If you encounter any problem EMAIL ME and i'll try to reply ASAP to help you with the installation.
Note - If you never installed .Net Framework on your PC, it will first take you to install the latest (.Net 4.0), so go with it the first time and then install the SW again.
Before you download and install the application I've linked below, there are few basic things that has to be installed on your PC - probabaly some of them already exist on your PC anyway, but verify just in case.
All of them free and really easy to install (5 minutes top), so follow the instructions how to:
- Active Home Scripting SDK Software- It is realy simple and free. Visit ACTIVEHOMEPRO website, go to the button of the page to the yellow square where it says "SDK Signup form", fill in the details and hit "I WANT MY SDK" button. In the next page, choose "Download Complete ActiveHome SDK Installation Package", download, launch it, follow the installation process and you're done!
- USB UIRT driver installation - If you want to have control over IR devices, Download the relevant driver for your operating system from USB-UIRT website, follow the instructions it's quite simple.
- FOR WINDOWS XP ONLY - Microsoft Speech Recognition SDK - you need this for the voice commands trigger. In windows 7 I think it is built in, in windows XP you can download it free from MICROSOFT WEBSITE, download "SpeechSDK5.1.exe", Unzip it wherever, and run "Microsoft Speech SDK 5.1.msi" to complete installation.
Now, that we have passed this, you can download & install the GSH Setup wizard .
INSTALLING THE APPLICATION
Download the application from the link below. If you encounter any problem EMAIL ME and i'll try to reply ASAP to help you with the installation.
Note - If you never installed .Net Framework on your PC, it will first take you to install the latest (.Net 4.0), so go with it the first time and then install the SW again.
| gsh2_0_2.msi |
Older Versions:
--
--
2. Getting to know GSH tool:
There are 4 main tabs to the left:
3. Configure your X10 devices:
Under settings tab, there are several configuration tabs:
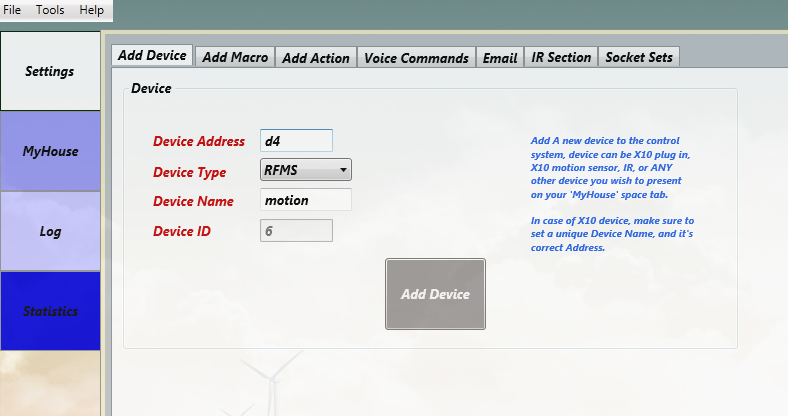
"Add Device": here you configure each X10 device you own and want to control over in this system.
There are 4 main tabs to the left:
- "Settings" - This is the tab that let you configure your X10 devices, Macro's, Actions, Voice commands, Email distribution list, IR codes and communication settings.
- "MyHouse" - after configuring your devices, this is the main monitor where you track all the configurations you have done, and even control some devices. Also- you can draw your spaces/rooms/whatever, and move the devices accross the board, adjust it the way you want.
- "Log" - This tab is for me. forgat about it.
- "Statistics" - for upcoming features, not supprted yet.
3. Configure your X10 devices:
Under settings tab, there are several configuration tabs:
"Add Device": here you configure each X10 device you own and want to control over in this system.
- Address: set the X10 address of the device (usually it is something you can set on the device, or it is hard-coded, look on the box).
- Type: It is either an X10PlugIn device (Lamp moudle / plug in device / built in X10 device), RFMS (motion sensor), or UIRT device.
- Name: name it as you feel.
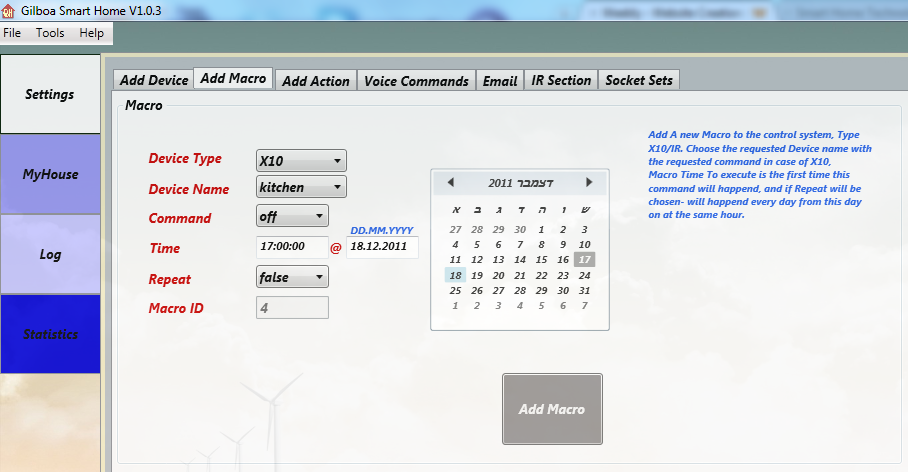
"Add Macro": You can set a macro only after a device is configured.
- Type: X10/UIRT.
- DeviceName: choose the device you want to "macro".
- Command: X10 On/off
- Time: you can schedule the macro time event and date. make sure time hasn't passed.
- Repeat: true - it means once the macro happened in the time you have scheduled, it will be triggered to happen at the same time the day after, and so on. false - the macro will delete itself after one time.
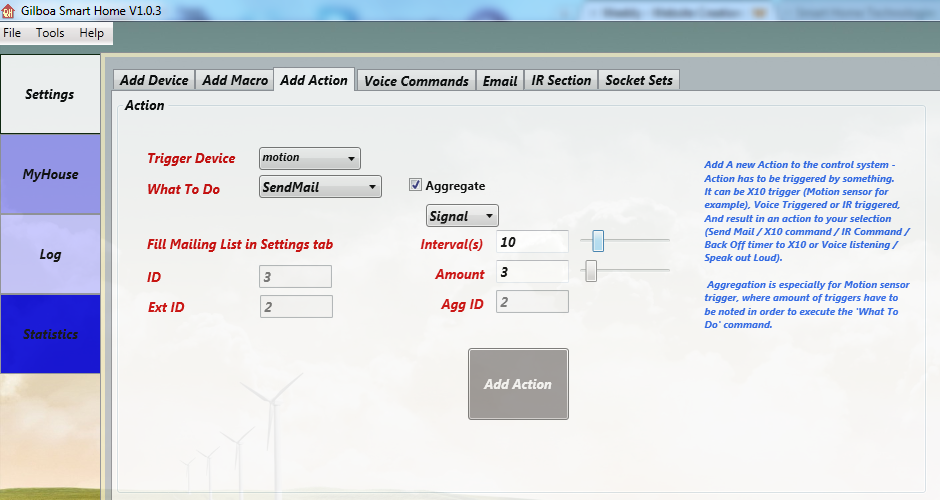
"Add Action": this is actually the coolest option in this app:
if you choose RFMS (motion sensor) as a triggere, check out "Aggregate" option below.
- Send X10 - once triggered, X10 will be sent under the device you configure, and with the command you configure (similar to macro, only that the trigger is not time schedule).
- Send IR - similar to X10, but with IR code send once triggered.
- BackOffTimer - You can set X10 or Voice Recogntion OFF for period of time configured ("Back of interval" in seconds). it can be usefull if you want, for example, to shout "OFF", and this voice command will trigger off the X10 all over the house for 60 seconds.
- Speak - once triggered, the windows speech rocognition will "SPEAK UP" the word you configure under "Say".
Classic config in case of RFMS (x10 motion sensor), is "Signal", 10 seconds, 4 amount of times.
hit "ADD ACTION" to configure it, once configured you can see it in "MyHouse" tab to the left, and delete it by hitting on it.
- Trigger device: this is the device that will trigger the action. this can be either X10 / UIRT event, or Voice Command triggered (in case you choose "voicerec" choose the exact word that will trigger the action under "Word").
if you choose RFMS (motion sensor) as a triggere, check out "Aggregate" option below.
- What to do: Choose what you want to do once triggered:
- Send X10 - once triggered, X10 will be sent under the device you configure, and with the command you configure (similar to macro, only that the trigger is not time schedule).
- Send IR - similar to X10, but with IR code send once triggered.
- BackOffTimer - You can set X10 or Voice Recogntion OFF for period of time configured ("Back of interval" in seconds). it can be usefull if you want, for example, to shout "OFF", and this voice command will trigger off the X10 all over the house for 60 seconds.
- Speak - once triggered, the windows speech rocognition will "SPEAK UP" the word you configure under "Say".
- Aggregate checkbox - this one is a bit complicated, so pay attention:
Classic config in case of RFMS (x10 motion sensor), is "Signal", 10 seconds, 4 amount of times.
hit "ADD ACTION" to configure it, once configured you can see it in "MyHouse" tab to the left, and delete it by hitting on it.
"Voice Commands": configure all the words you want the system to pay attention to, so you can then triggere actions when this word is recognized.
hit "ADD Voice Cmd" to configure it.
"Email": configure distribution list, in case you choose action "SendMail".
"IR Section": configure IR command (from a remote control)
configure the name of the command.
prepare your remote control, with the relevant botton, and place it in front of the UIRT reciever.
once you hit "Add IR Code", you have a couple of seconds you need to press on the button in the remote control in front of the UIRT, until the system has learned the new code.
"Sockets sets": configure your IP, and the remote client IP.
4. Monitor your home devices
Go to "MyHouse" tab, checkout all the devices macros and actions you have just configured. You can delete each one by hitting on it.
- ON/OFF X10 Plug in devices - the button to the right of your devices indicates if it's ON/OFF. you can hit on it to change the state of this device (or, in other words turn on/off this device). Check it out to see if it works.
- Disabling Voice Recogntion / X10 control - using the buttons to the right. It is sometime mandatory to shut down voice recognition if you have alot of noise and you don't want it to listen and maybe recognize some word.
- 60 seconds off - sometimes you need a "time to get away from the house" before you want all the actions to start happening (for example motion sensor triggered).. So hit 60 seconds off, leave the house immediatly and it will be back on once you've left.
- Draw - I've added this, so you can adjust your house devices the way you wish. Hit "Draw", use the ink colors and whatever to draw your rooms, your devices locations or what you wish. Once done you can also save / load previous ink drawing, and then hit "Finish".
- Move the devices across the canvas you have just drawed, take the mouse and go over a device (his number will appear in the middle of the arrows control), then hit up / down / left / right to move the device whereever you wish.
5. Save / Load configuration
Use the menu bar to save / load .cfg file so you don't need to re-configure it each time.
6. Known Issues and suggestions:
Feel free to donate for this tool developement to keep going on. I want to adjust it to other companies X10 devices, but purchase and delivering those babies cost me alot of money so any help will be welcomed....
Use the menu bar to save / load .cfg file so you don't need to re-configure it each time.
6. Known Issues and suggestions:
- It is preferable to connect the controller CM15 directly to wall plug without using power splitter.
- From what i've learned, some electrical plug ins are just not X10 compatible (maybe corrosion or other symptoms i can't explain). switch to other plug in and check if it works there.
- LM (lamp module) is not the most reliable device: it causes alot of noise on the Power lines and might blink sometimes. Also, LM doesn't have a unique X10 address, so there might be situation where several LM will operate on the same code.
Feel free to donate for this tool developement to keep going on. I want to adjust it to other companies X10 devices, but purchase and delivering those babies cost me alot of money so any help will be welcomed....
